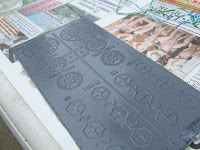
A few weeks ago, i've made a picture set of the panel making process, so here are the details.

Wash the panel with water, and dry it... The height distance between the untouched surface, and the etched one is about 0.2-0.3 mm. I think its ideal for painting, i don't need to etch it down to 0.4-0.5 like the instructables article suggest it.

After 24-48 hours of drying (depending on paint), scrub off the excess paint with a rough surfaced sponge. If everything is done correctly this can't damage the paint on the lower surface too much, but takes the laser toner layer off with the spray paint on it.
Drill the panel, then clear the surface, and cover with clear coat. This eliminates the small scratches.
Enjoy your panel, and show it to me! :)
2009/07/21
Front panel making, detailed
![]() 0
megjegyzés
Date:
09:28
Címkék:
diy,
etching,
front panel,
hydrogen peroxide
0
megjegyzés
Date:
09:28
Címkék:
diy,
etching,
front panel,
hydrogen peroxide
2009/07/05
Wiring...
The last few weeks wasn't really productive (it's summer...), but i've started wiring up the frontpanels. It's not an easy job for me...
Here are the YuSynth ADSRs, and the YuSynth sample&hold + noise, and the YuSynth ringmod.


![]() 0
megjegyzés
Date:
22:59
Címkék:
adsr,
analog synthesizer,
modular synthesizer,
yusynth
0
megjegyzés
Date:
22:59
Címkék:
adsr,
analog synthesizer,
modular synthesizer,
yusynth
Subscribe to:
Comments (Atom)


