2009/05/11
2009/05/01
FP Drilling, and the case part 2
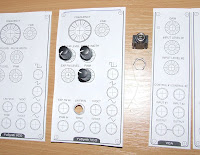
Today was a productive day! The case was clear coated, and I need to wait 24 hours before I can continue the work. I've drilled the front panels, made 8mm holes for the pots. The jacks need 12mm ones, which I can't drill at home, so next week I will drill these at my workplace.
 If I'll finish all of the drilling, I'll have 9 panels, with these modules:
- 2 VCOs
- 2 VCFs
- 2 ADSRs
- 2 LFOs
- 4 VCAs
- Dual ringmodulator
- Noise + Sample and hold
![]() 0
megjegyzés
Date:
17:50
0
megjegyzés
Date:
17:50
2009/04/27
The case
The case is almost finished! It only needs to be clear coated to protect the surfaces. It's very lame, made by me. :) The wood parts was taken from old furniture, shelves, and garbage. This case can hold 8x2 modules, totally 16 of my nonstandard sized modules. More pictures with the front panels coming soon! :)

![]() 0
megjegyzés
Date:
10:11
0
megjegyzés
Date:
10:11
2009/04/14
My first real front panel
I've found a great article on instructables.com: How to etch aluminium panel with reusable acid. This method uses the same cheap acid, which is able to etch copper pcbs. This process is easy, and cheap, so here are the results of my test:


The first panel is not perfect, but usable! Some of the drawings are missing, but I'm satisfied. Finally, no more laminated paper or other shitty quasi-paneling tricks. :) Real aluminium, painted, and lacquer coated. :) Looks good, and feels good, and all DIY!
![]() 0
megjegyzés
Date:
20:12
0
megjegyzés
Date:
20:12
2009/02/28
Front panel prototyping
I'm designing my own panel layouts with the great free and opensource vector graphics program: Inkscape (available for Windows, Mac, and Linux!). This program creates SVG files, and with the clone function it's easy to draw consistent panel elements. For example, if I change the size of the original element, all of the clones resizing too.
I'm tested the layout, and it seems to everything is at usable distance. The graphics needs to be refined, but the dimensions are fine.
![]() 0
megjegyzés
Date:
20:26
Címkék:
diy,
front panel,
prototype
0
megjegyzés
Date:
20:26
Címkék:
diy,
front panel,
prototype
2009/02/18
One half of the PSU
Hoooraay, two of the +15V supply rails are built up, and functioning! Each of them is capable of cca 500 mA, which is quite good for me. The red leds shows the 2 regulated output, and the yellow ones indicating the unregulated. Next time, of course I will finish the -15V side.

![]() 3
megjegyzés
Date:
20:31
Címkék:
psu,
synth,
testing
3
megjegyzés
Date:
20:31
Címkék:
psu,
synth,
testing
2009/02/09
The PSU parts
We have done with the PSU PCB, and drilling is completed. My father helps me to complete this project, he has the experience for this. The PSU parameters are: +/-15V, 2x1A, with two 7815 and two 7915 voltage regulators.
We need to mount the aluminum heatsinks, the transformer, and then begin to solder.
![]() 2
megjegyzés
Date:
20:43
2
megjegyzés
Date:
20:43
2008/12/22
The progress of ADSRs and VCFs
Yesterday i've spent a little time working with the ADSRs and Minimoog VCF boards. When my ordered parts arrived, i've checked the list, soldered few resistors, capacitors, and trimmers in.
Fixed a few shorts, etc.
The current state of the PCBs is this:
I've ordered a toroid transformer, and some other parts for the PSU. I need to get some time, and I will continue these PCBs, and start to draw the PSU schematics...
![]() 0
megjegyzés
Date:
18:08
Címkék:
adsr,
minimoog vcf,
yusynth
0
megjegyzés
Date:
18:08
Címkék:
adsr,
minimoog vcf,
yusynth
2008/12/18
Video: The future demised
Video: Mortum
Music: Vinnui
Download high quality video
![]() 0
megjegyzés
Date:
14:15
Címkék:
music,
video
0
megjegyzés
Date:
14:15
Címkék:
music,
video
2008/11/26
Building the Minimoog VCF clone PCBs

As you can see, we are working hard! :) This time in the kitchen. :) I don't have a proper room for this, which is dissapointing, because i need to move the stuff in and out every time...
My son loves to poke with the tools, specially with the dangerous ones: hot, or sharp. :)
Usually i'm missing parts, i need to order a bunch of resistors, capacitors, etc. The VCAs, the ADSRs and the mixer boards also need them, so i'm writing a list.
Still, i need to build a PSU, with a +5V output for a midibox MIDI2CV unit.
Sooo much work to do!
![]() 4
megjegyzés
Date:
21:38
Címkék:
analog synthesizer,
diy,
minimoog vcf,
pcb
4
megjegyzés
Date:
21:38
Címkék:
analog synthesizer,
diy,
minimoog vcf,
pcb


